IPS common database creation and IPS DBUPGRADE
Create a new empty database
The first step is to create a new database in SQL Server. To do this you need a management tool; the standard graphical tool is Microsoft SQL Server Management Studio (free download from Microsoft), or there is a command line tool 'sqlcmd'.
As an alternative, you may have been provided a starter database (as a BAK file) by Quorum Software. In this case, use the 'Restore Database' option in SQL Server.
The common database name is at your choice; you will need to enter the name into the IPS Server configuration.
The required settings for the new database are:
- Collation: Latin1_General_100_CI_AS_WS
- Compatibility level: SQL Server 2016 (130)
The choice for Recovery Model will depend on the overall policy for backup and disaster recovery (DR) of the Planning Space deployment. The 'Simple' recovery model keeps the transaction log growth to a minimum and provides for best database performance. However this will entail a DR approach that is based on full and differential backups, in line with the required recovery point objective (RPO). If High Availability (always on, or mirroring) is a requirement, and/or point-in-time data restoration, then the 'Full' recovery model will be needed.
Apply the IPS DBUPGRADE program
The second step is to run a program called 'IPS DBUPGRADE' which creates the database tables and configuration required by IPS Server.
If you have used a starter database provided by Quorum Software, please check if this upgrade step is required. The upgrade program will grow the SQL Server logs due to creation of recovery log data; if the operational database Recovery Model setting is not 'Simple' then it is recommended to temporarily switch it to 'Simple' during the upgrade, in order to avoid the possibility of disk space overflow.
To run IPS DBUPGRADE requires Microsoft Office (version 2010 or later) to be installed in the machine where the upgrade program is running (this can be any machine with network access to the SQL Server machine).
Use the 'DBUpgrades' program (downloadable from https://clients.aucerna.com/products/downloads) which is a zip file containing two zip files named 'DBUpgrade_16.5.x.xxxx' and 'IPS_DBUpgrade_16.5.x.xxxx' where 'x' is the update number, and 'xxxx' is the build number (which is not normally significant for users).
The IPS DBUPGRADE version number must be the one that is required for the version of IPS Server/Planning Space that you are installing. If you are not installing the current version, check with Quorum Software Support for what is required.
Note: It is recommended to disable realtime antivirus software if you experience slow performance of the DBUPGRADE programs. Version 16.5 Update 7 and later contain code improvements which should make this problem very unlikely.
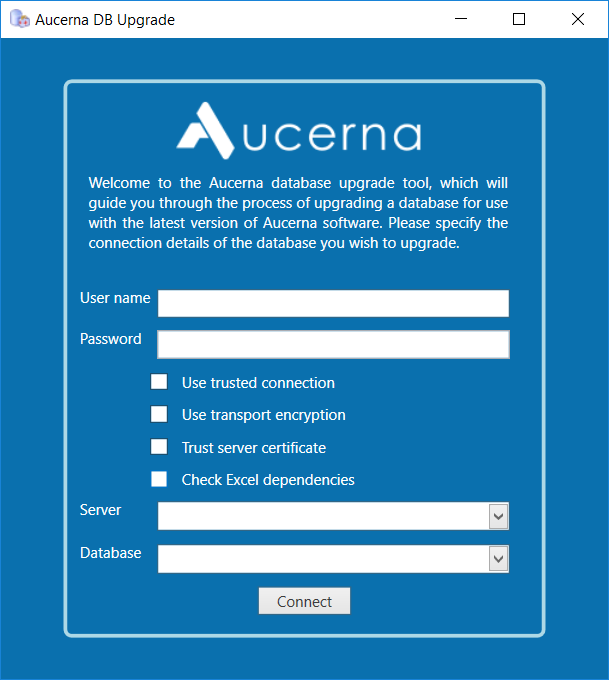
Unzip 'IPS_DBUpgrade_16.5', and run the executable 'Palantir.DBUpgrade.exe'. You should see a program window like this:

The SQL Server account that you use here needs to have the permission role 'db_owner' for the common database. If the SQL Server account is linked to your current Windows login, click the box 'Use Trusted Connection'. Otherwise, enter the Username and Password of a SQL Server authenticated account.
In the 'Server' field, click the down arrow to show a list of the SQL Server instances detected in the current Windows domain, and select the name of the SQL Server instance that you are using.
In the 'Database' field, you can type in the name of the common database, or click the down arrow to show the list of databases found in the SQL Server instance (note that you may not see any list, depending on the VIEW permissions of the SQL Server account).
If the SQL Server is configured with a self-signed or trusted certificate, you can enable SSL-based encryption by ticking the box 'Use transport encryption'. If you tick 'Trust server certificate' then the IPS DBUPGRADE program will trust any certificate that is offered by the SQL Server machine; otherwise the Windows certification protocols must be satisfied.
Important: The check box 'Check Excel dependencies' must be set to unchecked.
Click the 'Connect' button, and the program will check that the database is ready to be upgraded, then click the 'Next' button to start the upgrade process. The process should take a few minutes to complete.
A log file will be created at: 'C:\Users\{Username}\AppData\Local\Palantir\{DatabaseName}.txt'.
